*Image via Twigs & Honey
I've been lusting after some beautiful hair adornments lately, but my meager pay check meant that I needed to try to make them myself. After scouring the internet for a tutorial all I could find was a nice, simple DIY by a small town bride. I tried her version and a couple of my own. Here are my attempts at small, pretty, simple hair flowers:


Materials:
1/8 yard fabric
thread to match
needle
sparkly button
velvet leaves, wired
1/8 yard fabric
thread to match
needle
sparkly button
velvet leaves, wired
I found that for the sturdiest flowers dupioni silk was the easiest to cut and use. I bought a small remnant and still have plenty of fabric left to experiment with. I used pink silk chiffon, white dupioni silk, and two shades of yellow silk. The sparkly centers are buttons and the leaves are velvet and ran $3.00 for a stem of 17 (bonus, because they are already wired).

Yellow Flower

7. Wear proudly!

Yellow Flower
1. Gather your materials and begin cutting out petals. I found it easier to fold my fabric to create a guide for cutting. You could also sketch out lines using a fabric marker if you want to be more exact.

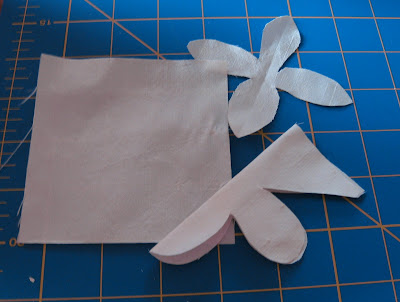
2.Simply fold the fabric to create a light crease and use the lines as a guide to cut evenly-spaced petals.
3. Cut enough petals to create a substantial stack. This flower contains several dupioni petals and several lightweight yellow silk petals.
4. Arrange the stack until you are satisfied and pin your flower petals in place. Pinning is the easiest and best way to achieve the results you want.
5. Thread your needle and sew your button into place. Sew your flower until the petals are securely in place. Attach leaves by sewing or gluing them on.
6. Attach a hair comb, barette or pin for a corsage.
White Flower

1. Cut petals. I used silk dupioni for this project. For this flower I simply folded my fabric in half to cut a symmetrical 4 petaled flower. Again, you can trace your design onto the fabric to have more control over your design.
Follow steps 3-6 as above and the finished product could look like this:

Pink Flower


Follow steps 3-6 as above and the finished product could look like this:

Pink Flower
This flower uses light weight silk chiffon. This fabric is more difficult to cut but makes lovely petals and bunches together nicely.

3. Repeat this process until you have reached your desired size. My completed flower contains 3 small circles bunched together.

4. Keep your flowe pinned together until you have sewn all of your petals into place. Add a leaf for some color & variety. Attach the leaf by sewing or by using a small dab of glue. You can complete this piece with a small hair comb, bobby pin or corsage pin. This small flower would also be a great shoe adornment. See Oh My Deer for inspiration.


2 comments:
great project, I have been trying to figure out how to make that last pink flower for weeks!
nikki
@Nikkibit - I mostly relied on trial and error when bunching up my chiffon. I cris-crossed my pins through the base to hold the pieces in place while I stitched them together so I wouldn't poke myself in the fingers. Let me know if you're successful!
Post a Comment